Tuesday, July 31, 2012

Dust Chronicle: Issue 1

The Inaugural issue of the Dust Fanzine is available now for free download!!

Featuring:
  • How2's for painting
  • SSU Battle Report
  • Interview with Paolo Parente
  • Fan Fiction from PDX DUST's very own John Sisk
  • Much, much more!!
Click the link for more information and Good Gaming!!

Friday, July 27, 2012

DUST World Expo


Reserve your spot for the 2013 DUST World Expo at Pheonix Vul-Con! Click the link for more details.

The event will include:
  • Free Dust Play
  • Tournaments
  • Cosplay w/Fashion Show
  • Science Fair
  • USO Show
  • and so much more!!
Support our DUST brothers in Arizona and sign up today!!

Wednesday, July 25, 2012

Operation Zverograd Arrives!!!


At last the campaign book arrives with all the details for the SSU and the new Allied and Axis Walkers!!


Click here for all the details!!!

Monday, July 23, 2012

First Aid! Play-test 1


First Aid
Play-test Part 1.
Date Played: 07/07/2012


The nearby Abby has been destroyed by stray Artillery Fire! The Abby was being used as a Medical facility for innocent victims of the raging war. Only part of the Abby remains and those who weren’t killed have abandoned the former sanctuary. Reconnaissance reveals that many of the medical supplies are still intact. Get to those precious supplies before the enemy!

What is the point of this game? The point is for the players to return an objective to each of their objective squares. There are only 7 objectives, in this case medical supplies, on the table so only 1 player can win!! Each player has 4 rubble tiles located along their deployment zone which are considered to be objective squares for that player’s force. These are where the medical supplies need to be dropped off after they are picked up by the units on the board. As soon as any player has 4 objectives simultaneously occupying on all 4 tiles wins the scenario. A unit carrying an objective must spend an action to pick up or drop off the medical supplies. Moving onto the objective square with the medical supplies is not enough, and they must be dropped off to be considered as occupying the space. An enemy unit may enter your objective square and steal the medical supplies. Reinforcements for all players start to arrive in Turn 8.

We were looking to create a “must win” scenario. No Turn limit, no victory points, no draw or sudden death, just a cut and dry one person wins and the other person loses scenario. A challenging objective was also very important since we didn’t want the structure to break down and become a typical elimination scenario. But we also wanted some longevity since sometimes the die rolls favor destruction and armies are quickly dwindled down or otherwise crippled. Thus the decision was made that each player gets +20 points starting in Turn 8 to help refresh their forces. It was also decided on that each player receives 1 Tank Trap and 2 Ammo Crates to place as cover, but we spaced that step out in our set-up due to our eagerness to play!

Special Terrain Rules:
  • Forest Tiles:
    Refer to OperationGhostlight for rules on Forest Tiles, but here are the basics:
    • Blocks Line Of Sight, except for a unit occupying the space.
    • Blocks Vehicle Movement
    • No Cover Elements may be placed on this square
    • Provides Soft Cover for Infantry Units.
    • Can be set on fire to become a Forest Fire Tile by Heavy Laser Weapons, Phaser Weapons, and Flame Weapons. See Operation Ghostlight for more details.
      • Forest Fire Tiles block all movement (including jump), block all line of sight, and cannot be occupied by an unit.
  • Rubble Tiles:
    • Provides Soft Cover for Infantry Units.
    • Does not block movement for any Unit.
    • Does not block line of sight for any Unit.
    • Ammo Crates and other Soft Cover elements may be placed on this tile.

Scenario Guidelines:


Map size needs to be 4 tiles by 4 tiles with a large multi-level structure in the middle of the map (minimum size of a single tile, or 9 squares, and a minimum of 2 stories with a roof). The multi-level structure does not have to be “solid” (i.e., part of the structure can be a single story with a roof, where other parts can be 2 or 3 stories high. It was hit by artillery fire, so it doesn’t need to be 1 full piece.). Since the building is heavily damaged and open to the world players may only enter on the building tiles that are physically present. In some instances this means that there is line of sight from the roof to the 1st floor since parts of the second floor are missing altogether. The rules for Jump and Artillery Weapons still apply (i.e., no jumping into the middle of the building through the hole, and no Artillery Strikes unless the payer is on the roof). Players may use normal Terrain Tiles to add a little more stability, if desired. Additional Terrain Tiles may be placed on other portions of the map. 4 to 6 tiles should be sufficient.
  • No Turn Limit
  • Army Points:
    • 350 points for each army
    • Starting in Turn 8 each player will gain an additional 20 points each turn to spend on units to bring in as reinforcements. These points stack with other unspent points so players may choose to wait several turns to buy more expensive units. Units bought with these points must be placed before the player’s final activation.
  • Cover Elements (per army):
    • 1 Tank Trap
    • Tank Traps cannot be placed in the building or on a Forest Tile
    • 2 Ammo Crates
    • Ammo Crates may be placed in the building or on a Forest Tile
    • Cover cannot be placed on the deployment zones or objective tiles.
    • The Rubble Tiles acting as the objective squares will still provide Soft Cover to units that occupy them.
  • There are 7 objectives on the board. These represent the medical supplies that the players are looking for. Each player rolls 3 combat die and the one with the most hits takes 4 of the objectives, and the loser takes 3 of the objectives. The player who won the die roll starts placing the medical on any legal space inside, or on top of, the structure. Objectives may not be adjacent to one another and cannot be placed outside of the structure. Each player has 4 objective squares spaced evenly apart in their deployment zone that are marked with Rubble Terrain, and follow the associated Terrain rules. (4 tile’s wide, so each objective tile should be the center square of each tile along the map edge). The first player to return a single objective to each individual objective square wins the scenario.
  • Rules for objectives (a.k.a. medical supplies):
    • It costs one action to pick up an objective.
    • It costs one action to drop an objective.
    • Only infantry units and Heroes can carry an objective, and any single unit can only carry a single objective at a time.
    • An objective may be dropped at any time, as long as the unit has the required amount of actions.
    • An objective may be picked up from any location, including an opponent’s objective square, but cannot be taken from a unit that is carrying an objective.
    • An objective square may only have a single objective placed on it at any given time.
    • If a unit carrying an objective is eliminated, the objective is dropped on that square, is considered to be occupying said square, and available to pick up.
  • Attacker:
    • Retrieve 4 the medical supplies (objectives) and return one to each of the 4 objective squares!
  • Defender:
    • Retrieve 4 the medical supplies (objectives) and return one to each of the 4 objective squares!
  • Points & Victory:
    • There are only 7 objectives and the first player to retrieve and drop off an objective on all 4 objective squares will win the engagement.
      • A player will not automatically win by eliminating their opponent. Reinforcements will always arrive on Turn 8, so the players are in the game until one player fulfills the requirements of the objective.
    • Victory Points do not aid in determining a winner of the engagement. Players may record Victory Points if they are needed for part of a larger campaign or league play.


Justin v. Christian
  • Attacker:
    Justin – Allies:
    350 points
    Action Jackson –
    Johnny One-Eye – OZZ-177 – Rhino – BBQ Squad – Crack Shots – Grim Reapers – Grim ReapersRecon Boys – Recon Boys – The Boss – Pounder – Rattler 
  • Defender:
    Christian – Axis: 350 pointsLara – Manfred – Markus – Axis Gorillas – Axis Zombies – Beobachter – Heavy Laser Grenadiers – Kommandotrupp – Sniper GrenadiersSniper Grenadiers – Sturmpioniere – Lothar – Ludwig – Ludwig
  • Turn 1:
    Basic Deployment with both sides charging their units up to the building and trying to keep the lanes of fire across the board clear.


  • Turn 2:
    The Allies moved into a few objective squares, as did Markus and his Axis Gorillas. Some action was exchanged between Manfred’ Sturmpionieres and Rhino’s Hammers. The Allied forces underperformed and took some major hits. OZZ and his Grim Reapers were also able to move into position and cause Markus to suffer some wounds. The Axis Zombies pick up a medical supply objective.


  • Turn 3:
    Rhino and his Hammers were able to harass Manfred and his Sturmpioniere’s before being eliminated. Markus and his Gorillas made an attempt to flee with their objective, but were ultimately cut down by Action Jackson and his Red Devils. A Ludwig and the Pounder traded blows, but the 8.8 cm guns proved too powerful and eliminated the Allied Walker. Johnny and his BBQ Squad pick up some medical supplies and head back towards one of their objectives, while OZZ and his Grim Reapers secure more medical supplies.


  • Turn 4:
    Both Allied units carrying medical supplies make a run for their objective squares. The Axis Zombies successfully reach an objective square and drop off the medical supplies they were carrying. The Recon Boys pick-up a third objective of medical supplies, while Lara and Manfred both move to pick-up more medical supplies. The other unit of Recon Boys move to position themselves to fire upon Manfred and his Sturmpioniere’s. The Allies lost their Crack Shots when they were unable to get a secure position to fire upon the Beobachters. 


  • Turn 5:
    The Allied units were able to drop off medical supplies on 2 of their objectives. Lara and her Heavy Laser Grenadiers reached their objective square, but no with enough actions remaining to drop the objective. The Sturmpioniere’s were eliminated by fire from the same unit of Recon Boys, but Manfred was still alive and kicking with one health point and was still carrying the medical supplies. The Grim Reapers fell to indirect fire from the Axis Lothar.


  • Turn 6:
    Lara and her Heavy Laser Grenadiers dropped off their medical supplies in an objective square. An Axis Ludwig was moving to flank the Allied player, and succeeded in eliminating the Allied Rattler. In response many of the Allied units were moved along the edge of the structure to prevent fire from the Ludwig and indirect artillery fire form the Lothar. The Allied units were able to finish off a unit of Sniper Grenadiers, but Action Jackson and his Red Devils fell to the Axis Zombies, who were making their way to a 4th objective. Manfred made his way toward another objective square. The second unit of Sniper Grenadiers were able to get into position to start harassing the Recon Boys carrying medical supplies.


  • Turn 7:
    The Allies used their Command Squad ability Field Repair to bring the Pounder back into the game and eliminate the flanking Axis Ludwig. Johnny and his BBQ Squad made short work of the Beocachters before falling to direct fire from the Lothar. The Axis Zombies picked up the last objective of medical supplies. At this point a unit of Recon Boys are trying to get to an objective square, but are threatened with fire form the remaining Ludwig and Lothar, as well as taking fire from Sniper Grenadiers. Manfred is still making his way to an objective square.


  • Turn 8:
    The Recon Boys were able to score eliminate the first unit of Axis Sniper Grenadiers. The other unit of Recon Boys was still unable to navigate the open space to reach their objective square and drop off their medical supplies, but they were able to eliminate the Sniper Grenadier threat. The Axis brought back their fallen Ludwig with the Field Repair ability and destroyed the recently revived Pounder. OZZ made a suicide move with his Heroic Attack to position himself to destroy the Kommandotrupp and any other units he could. The Axis used their points to bring in more Beobacthers and Sniper Grenadiers.


  • Turn 9:
    The start of this Turn saw the Allies win initiative and have OZZ cause a measly 2 wounds on the Kommandotrupp before falling to the Axis units. Manfred was finally able to reach an objective square and drop off his medical supplies, while the Axis Zombies came just one square shy of the final objective square. The Recon Boys were still too scared to make the run to the objective square with their medical supplies. The Allies used the 20 points form Turn 8 and 20 points from Turn 9 to bring a Rattler back into play to try and stop the Axis Zombies from reaching their destination. The Axis brought more Sniper Grenadiers into play.


  • Turn 10:
    The Allies took the initiative and moved the Rattler into position and eliminated the Axis Zombies who dropped their medical supplies! However the Sniper Grenadiers were in prime position to pick-up the medical supplies, and with a reactivation from the Kommandotrupp, were able to reach the 4th objective and drop off their medical supplies to secure an Axis victory!


  • Victor: Christian – Axis
  • Victory Points: 
    • Justin – Attacker: 167 points 
    • Christian – Defender: 324 points
What a terrific game! This was a blast to play and I have to thank my opponent, Christian Honetschlager, for conceiving of such a great scenario. I can see a lot of potential in this scenario and look forward to further play-testing.


The Allies came very close to taking this game early. Rhino and his unit of Hammers performed a Sustained Berserk Attack on Manfred and his Sturmpionieres only to score a grand total of 3 hits!! Had the dice followed the statistical average the Axis unit would have been quickly eliminated and the Allies would have been holding 4 objectives by Turn 4.


Manfred definitely gains the MVP award for this scenario. Surviving a Sustained Berserk Attack, fire from Action Jackson and his Red Devils Phaser Weapons, attacks from the Recon Boys, and managed to walk the objective from the roof all the way down to one of the farthest objective squares. The Axis Zombies did a great job of securing 2 different medical supply objectives and were definitely key for the Axis gaining a victory.


What are some things I can try in the next Play-test? 
  • Reinforcements arrive earlier than Turn 8. Maybe Turn 6 would be a good alternative.
  • Tank Traps and Ammo Crates are definitely needed to help units move around the board and block infantry Line Of Sight. 
  • More objectives to help speed up the scenario. Maybe 9 objectives in total.
More importantly, what do you think? Try this scenario out with your local gaming group and email us your results at pdxdusttactics@yahoo.com. What changes would you make? What do you like and what would you like to see changed?


Stay tuned for more scenarios that we are currently Play-testing and other announcements.  Good Gaming!!

Thursday, July 19, 2012

AMBUSH!!! Play-test 1


AMBUSH!
Play-test Part 1.

Date of Play: 07-07-2012

Your intelligence network has discovered the movement of an enemy platoon, but you must act quickly and travel fast to reach them in time and set up an ambush! Prevent as many units as possible from escaping the ambush until your reinforcements arrive.

What is the point of this game? The point is for the Attacker to eliminate as many enemy units as possible, and the Defender needs to escape as many of their units as possible before more Allied units join the party! The Defender’s forces are spread out and the remaining units will come onto the board in later turns.

The Rules and points were designed to keep the Attacking force light, but still capable of packing a punch. Also, the Attacking force has a great element of surprise that has the potential for creating a great deal of damage early on in the game. To combat this advantage the Defender will have a gradual deployment in the first 4 to 5 Turns (depending on the size of the army) which allow them to keep from getting annihilated in the first couple turns, and gives the Attacker something to think about when they spring the Ambush and expose their units.

Victory Points were the hardest aspect to determine. How does each player score Victory Points? Does the Defender get any points for kills (full or half)? Does the Attacker get double or single points for each kill, since they are an inferior force? In the end the decision was made to look at the objective of each player to determine how they score Victory Points. Since it is the Attacker’s objective to eliminate enemy units they get full points for each enemy unit they fully eliminate. The Defender’s objective is to escape, so they get full points for each unit that is able to escape the Ambush. More information will be presented after the battle report regarding the different scoring options and what they would have looked like.

Special Terrain Rules:
  • Forest Tiles:
    • Refer to OperationGhostlight for rules on Forest Tiles, but here are the basics:
      • Blocks Line Of Sight, except for a unit occupying the space.
      • Blocks Vehicle Movement
      • No Cover Elements may be placed on this square
      • Provides Soft Cover for Infantry Units.
      • Can be set on fire to become a Forest Fire Tile by Heavy Laser Weapons, Phaser Weapons, and Flame Weapons. See Operation Ghostlight for more details.
  • Rubble Tiles:
    • Provides Soft Cover for Infantry Units.
    • Does not block movement for any Unit.
    • Does not block line of sight for any Unit.
    • Ammo Crates and other Soft Cover elements may be placed on this tile.


Scenario Guidelines:
  • 8 turn limit (250 points) or 10 turn limit (300 points)
  • Army Points:
    • Attacker: Approximately 70% of Defender’s forces
      • Limited to:
        • Armor 1 & 2 Infantry
        • Armor 1, 2, & 3 Vehicle
        • Maximum of two Armor 2 Heroes.
        • No Aircraft
  • Defender: Approx. 250 – 300
  • Examples:
    • Defender has 250 points in their army. The Attacker’s army should be around 175 points.
    • Defender has 300 points in their army. The Attacker’s army should be around 210 points.
  • Cover:
    • The Attacker places 3 rubble tiles on the road between, but not in, the Defender’s deployment zone and objective squares.
  • Special Rules:
    • Attacker Deploys army in secret before Defender.
    • Defender Deployment:
      • Deploy up to 100 point in Turn 1, however they may not move into the Attackers deployment zone during the first turn.
      • 50 additional points are available to Deploy units in Turn 2 (50 + unused points from Turn 1).
      • 50 additional points are available to Deploy units in Turn 3 (50 + unused points from Turn 1 & 2).
      • 50 additional points are available to Deploy units in Turn 4 (50 + unused points from Turn 1 & 2 & 3).
      • If the Defender has a 300 point army; 50 additional points are available to Deploy units in Turn 5 (50 + unused points from Turn 1 & 2 & 3 & 4).
    • First turn:
      • The Defender deploys units during the first turn. Once the last unit has finished their activation the Attacker shows the Defender his secret placement and then places their army on the board.
      • The Attacker then activates their units as normal, with 2 actions. Once the last unit has finished their activation the round ends and turn 2 begins following normal Dust Tactics game play (roll initiative, and alternate activations, etc…)
  • Attacker:
    • Eliminate as many of the Defender’s units as possible before the end of the last round!!
  • Defender:
    • The goal of the Defender is to “Escape the Ambush” by moving as many units as possible to the objective tiles and off the edge of the map. Moving to the edge is not enough to leave the map. The unit must have enough movement points available to move off the map.
  • Points & Victory:
    • Attacker:
      • Normal points for each enemy unit fully eliminated
    • Defender:
      • Normal points for any units that escape the Ambush
    • Victory Conditions:
      • All rounds are played out in full with one exception; the game immediately ends when the Defender has lost and/or successfully escaped all of their units off the board.
      • Tally all points. Whoever has the most points wins the scenario.
        • Note that it is possible for the Defender to eliminate all Attacking units and still lose if they don’t score enough points.
Justin v. Christian
  • Attacker:
    Justin – Allies: 173 points
    Johnny One-Eye – The Chef – 13 Foxtrot – BBQ Squad –Hell Boys – The Gunners- Blackhawk - Wildfire
  • Defender:
    Christian – Axis: 251 points
    Lara – Markus – Axis Gorillas – Axis Zombies – Heavy Flak Grenadiers – Recon Grenadiers – Sturmpioniere – Heinrich – Heinrich – Luther
Turn 1 saw a little action when The Sturmpioniere’s set fire to a forest, which blocked Johnny and his BBQ Squad from moving into a safe position from which to launch their attack. However, Chef and his Hell Boys were able to move into a great position and fire on the Axis Zombies to eliminate the undead unit. The four flamethrowers rolled 10 hits on the undead unit, whose Damage Resilience only saved against 1 of the hits! The Axis won the second initiative and focused Lara and her Heavy Flak Grenadiers on Chef and his Hell Boys, doing a great amount of Damage. The Luther then placed and followed up with a long ranged attack on Chef and the Hell Boys, while focusing its Kampfzange on the Gunners in the adjacent forest. By the end of Turn 2 the Allies lost Chef and his Hell Boys, the Axis lost its Sturmpioniere unit, and Lara and the Heavy Flak Grenadiers took some heavy damage from Johnny and his BBQ Rangers. Turn 3 saw more Axis Reinforcements as Markus and his Gorillas, the Recon Grenadiers, and both Heinrich’s entered the battle. The Blutkreuz Ape unit Charged in and eliminated the Blackhawk with little effort. Lara and her Heavy Flak Grenadiers fell to Johnny and his BBQ Squad. The Gunner Rangers were not able to fend off attacks from the Luther and fresh Recon Grenadiers. Turn 4 brought no eliminations or escaped units, but Johnny and his BBQ Rangers took charge and rushed the Axis units with little effect as the unit dreadfully underperformed. Turn 5 started with another Axis initiative, which meant a quick end for Johnny and his BBQ Squad at the hands of Markus and his Axis Gorillas. The Axis Gorillas fell in Turn 6 to the Wildfire, but Markus was still alive and kicking with one wound remaining, so he Charged the damage Allied Light Walker to finish it off, and secure safe passage off the board! The Recon Grenadiers were able to make short work of the 13 Foxtrot unit taking cover in the forest. Turns 7 and 8 saw the Axis unopposed, which allowed the remaining units to escape the Ambush with ease.


Victor: Justin - Allies

Victory Points:
  • Justin – Attacker: 128 points 
  • Christian – Defender: 122 points
What an interesting game! Overall the Play-test went much better than anticipated. The biggest concern at the end of the game was to look at the points and identify the different options available for scoring. The decision was made that only full enemy kills would count for the Attacker, and escaping the Ambush would count for the Defender. This left a 6 point difference at the end of the game. Very close! Other ideas were to give the Attacker double points for full unit kills, while the Defender would get half points for full unit kills and full points for each unit that escaped the Ambush. This would have resulted in the Attacker scoring 256 points and the Defender scoring 209 points. Another idea was to just count kills for each side. The Attacker would have stayed the same at 128 points, where the Defender would have scored roughly 173 points. With the 3 different examples of scoring we felt confident we choose the correct method of scoring by sticking to each unit’s objective. This setup was just for the first round of Play-testing. The next round will definitely see a few modifications to the structure of the scenario, with a possibility on changing the scoring system.

What are some things I can try in the next Play-test?

Have an objective. Defender chooses 1 unit as the objective. That unit will reward Double its value in Victory Points. The Defender will get the points if they are able to escape the unit. The Attacker will get the points if they are able to destroy the unit. No points if the unit is not destroyed or does not escape.

Maybe a small structure could assist with the ambush? Grim Reapers and a well-placed Sniper could do a lot of damage… A well placed Light Walker in a small garage brings many options to the table. It could also make for a great distraction.

Only 2 x 3 for the Defender Deployment Zone. A slight increase in the challenge of escaping the map.

Perhaps Attacking units in cover or not in L.O.S. are not revealed until:
  • The Attacker activates the unit and takes any actions other than “Nothing”. 
  • The Defender places a unit in an adjacent square. 
    • Could eliminate the need for the rule that the Defender cannot enter the Attacker’s Deployment Zone on the 1st Turn. 
    • If the Defender’s movement would end in the hidden units square, resolve a single close combat engagement and place the Defending unit in the adjacent square that follows its movement. If that square is occupied, then any square adjacent to that square is valid for placement. If no adjacent squares are available the unit is eliminated.

More importantly, what do you think? Try this scenario out with your local gaming group and email us your results at pdxdusttactics@yahoo.com. What changes would you make? What do you like and what would you like to see changed? 

Stay tuned for more scenarios that we are currently Play-testing and other announcements.  Good Gaming!!

Monday, July 9, 2012

Dust Tactics League Play!! 07-08-2012


Red Castle Games was the location for the final gathering of the PDX Operation Blue Thunder v2.0 League! We had a new player interested in the game and watched as John and Nicholas played the first game. We weren't able to take any pictures due to a mixture of a headache from seasonal allergies and the inquiries Jason, our interested player, were making. We hope to see Jason soon and look forward to some Demo games! Don't forget to check out the SSU Battle Report.

Scenario 11: Getting Out Of Here


The goal is simple. ESCAPE!! You have 8 rounds to get to your objective square and score triple points.

John v. Nicholas
  • Attacker:
    John - Allies: 299 points
    Bazooka Joe - Rhino - The Priest - BBQ Squad - BBQ Squad - Grim Reapers - Tank Busters - The Boss - The Hammers - Mickey - Wildfire
  • Defender:
    Nicholas - Axis: 300 points
    Beobachter - Beobachter - Heavy Kommandotrupp - Kommandotrupp - Heinrich - Heinrich - Lothar - Ludwig - Sturmkönig
The Axis had to wait until the 4th Turn before all of their units were on the board. The Allies were able to cover a lot of distance in their first Turn, but the Axis Walkers were able to cause a bit of damage before the game was finished. The Allies were able to eliminate both Beobacther units and the Heavy Kommandotrupp in the 1st Turn. The next 3 Turns saw the Axis remove the Wildfire, Mickey, and Bazooka Joe from the Allied forces. The Allies  escape Rhino, The Hammers, Grim Reapers, Tank Busters, and the BBQ Squad for triple points in Turn 5. but lost The Boss, who were instrumental in aiding the Allied forces and their ability to cover such a great distance. The Priest and his BBQ Squad escaped in Turn 6 for triple points, and the Axis were not able to get any units to the objective tiles by the end of Turn 8.

Victor: John - Allies
  • John - Attacker: 591 points
  • Nicholas - Defender: 117 points

Nicholas v. Justin
  • Attacker:
    Nicholas - Axis: 300 points
    Beobachter - Beobachter - Heavy Kommandotrupp - Kommandotrupp - Heinrich - Heinrich - Lothar - Ludwig - Sturmkönig
  • Defender:
    Justin - Allies: 299 points
    Bazooka Joe - Corps Officers - Crack Shots - Grim Reapers - Grim Reapers - Hell Boys - Recon Boys - Recon Boys - Fireball - Steel Rain
The Allied Player may have been better off with a Punisher, but the mere existence of the threat of Axis Zombies and Gorillas tilted the decision in favor of the Fireball. The Axis were able to get all of their units onto the board before the end of Turn 3. The Allies lost the Crack Shots, and the Axis lost a Beobacther unit in Turn 1. Turn 2 saw the Allies cover a lot of distance, but the Recon Boys fell to distance available to the Axis guns. The Allies gained some much needed relief when the Steel Rain was able to eliminate the Ludwig and a Heinrich, while the Fireball used it's .50 cal MG dual to finish off the Kommandotrupp before the end of Turn 3. However, the Lothar was able to get a clear line of sight on the Steel Rain and used it's Nebelwerfer to eliminate the Allied Artillery unit. Joe and his Hell Boys escaped in Turn 4, followed by the Grim Reapers and Recon Boys in Turn 5. The Allies used their remaining Grim Reapers to finish off the other Beobacther unit, but lost the Corps Officers to the Sturmkönig after injecting the Recon Boys with the Serum they needed to exit the battle. The last unit of Allied Grim Reapers escaped in Turn 6, but it took until Turn 8 for the Fireball to fall to the relentless fire from the Axis Walkers.

Victor: Justin - Allies

Victory Points:
  • Nicholas - Attacker: 180 points
  • Justin - Defender: 473 points


Justin v. John
  • Attacker:
    Justin - Allies: 299 points
    Bazooka Joe - Corps Officers - Crack Shots - Grim Reapers - Grim Reapers - Hell Boys - Recon Boys - Recon Boys - Fireball - Steel Rain
  • Defender:
    John - Allies: 299 points
    Bazooka Joe - Rhino - The Priest - BBQ Squad - BBQ Squad - Grim Reapers - Tank Busters - The Boss - The Hammers - Mickey - Wildfire
The speed granted to the Allies did a great deal to spice this mission up a bit. John lost his Wildfire and Mickey to the Steel Rain in Turn 3, and the Fireball's .50 cal MG dual was able to eliminate John's Tank Busters. John escaped his Rhino and The Hammers in Turn 4, while Justin was able to eliminate John's Bazooka Joe and his BBQ Squad. John was able to eliminate a unit of Justin's Grim Reapers before the end of the Turn. John escaped the last miniature of his BBQ Squad in Turn 5 after Justin's reactive fire eliminated The Priest and the other 4 miniatures. Justin's Recon Boys blocked the Objective Square in Turn 6 and allowed the rest of his Allied forces a chance to eliminate John's Grim Reapers, then moved his own unit of Grim Reapers to escape the battle. John only had a the Commander miniature of The Boss remaining. Justin escaped his Recon Boys in Turn 7, followed by the Crack Shots, Bazooka Joe, Hell Boys, and the Corps Officers at the end of Turn 8. John's Command Squad was left to think about it's failure and as a sacrifice to the unknown enemy attacking the city.

Victor: Justin - Allies

Victory Points:
  • Justin - Attacker: 595 points
  • Justin - Defender: 260 points

The League is finished and we have a winner!!

Nicholas Gyore is declared the winner of the PDX Operation Blue Thunder v2.0 League. He scored the most victories to obtain a grand total of 48 League Points! Justin came in second with 33, and John with 18. Justin gains the bragging rights for "Best Attacker" with a score of 2272 VP points as the Attacker in each scenario, as well as bragging rights for "Best Defender" with a score of 2363 points as the Defender in each Scenario. John proved his ability as a Defender since each player had comparable scores.

We will be taking a break for a couple weeks, but will return before the end of the month with a new direction for the PDX Dust League. There are a few more battle reports and custom games that will be posted during the break, as well as an update to the Unit Cards.

Good Gaming!!

Sunday, July 8, 2012

SSU Battle Report from June 2012!


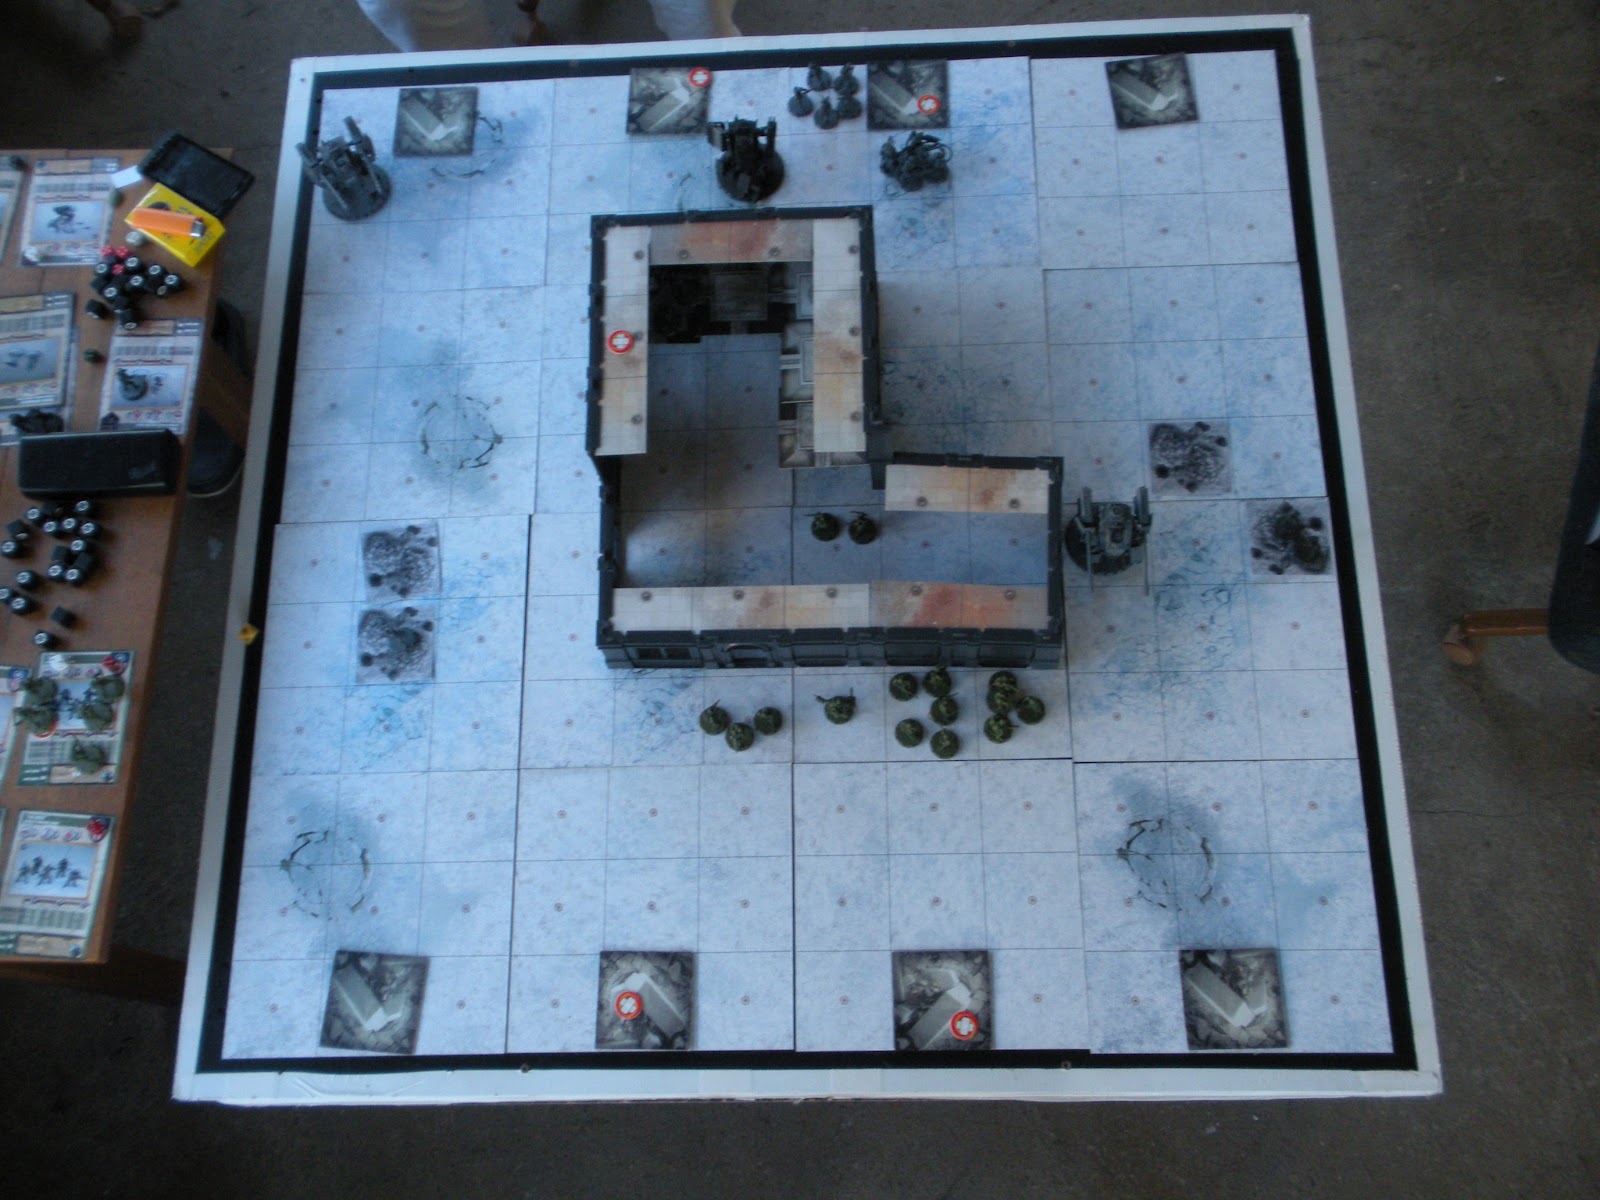
The map from Mission #4, The Crossroads, from the Operation Cyclone Dust Tactics Campaign Expansion was used for this battle, but the objective was changed to Elimination. Axis are Attacking, and SSU are Defending. The map tiles are 4 wide by 3 deep. Each player deploys along the long edge of the map, however Terrain Tiles are arranged so that there are 4 separate map sections, that all meet in the middle, hence “The Crossroads”. Both Players deploy along the long map edge, but are split up between the 2 sides and are “kitty corner” to each other. So the Attacker will deploy along the long edge on the “North-West” and “South-East” sides of the map, where the Defender deploys along the long edge on the “South-West” and “North East” sides of the map. Cover can only be placed on the center tiles and there is no turn limit.

  • Justin’s 268 point SSU Army:
    Grand’ma (KV47-B(M)) – Koshka (Captain Koshka Rudinova – Smersh) – The Medvedi (SSU Command Squad) – Fakyeli (SSU Close Combat Squad) – Frontoviki (SSU Battle Squad) – Ohotniki (SSU Rifle Squad) – Chinese Volunteers (SSU Auxiliary Attack Squad) – Nabludatyel (SSU Observer Team) – Jnetzi (SSU Sniper Team) – Natasha (KV47-B) – SSU Airborne Transport (MIL MI-45)
     
  • Christian’s 270 point Axis Army:
    Angela – Lara – Markus – Axis Gorillas – Axis Zombies – Heavy Flak Grenadiers – Battle Grenadiers – Sniper Grenadiers – Recon Grenadiers – Ludwig – Luther – Heinrich – Heinrich


Turn 1:
Initiative: SSU
  • The Medvedi Places and Reactivates the SSU Airborne Transport with the Get Moving You Bunch of Monkeys! Skill.
    • SSU Airborne Transport targets Angela and her Sniper Grenadiers using the Hover Skill for a Sustained Attack.
      • Quad DahK 12.7 mm rolls 6 Hits to eliminate the sniper threat early in the game.


Turn 2:
Initiative: SSU
  • Lara and the Heavy Flak Grenadiers perform an Assault Move and Attack the SSU Airborne Transport.
    • Lara’s two MG 44 zwei’s roll 1 hit on the Transport.
    • The three Fliegerfaust’s utilize their Burst Weapon Ability since the target has not moved this Turn and roll 3 hits on the Transport.
  • Koshka and her Fakyeli perform an Assault Move and Attack Lara and the Heavy Flak Grenadiers.
    • Sulfur Thrower rolls 4 hits, which are all saved by Damage Resilience.
    • Five Shotguns roll 5 hits. 2 hits are saved by Soft Cover. Damage Resilience provides no effect to reduce the remaining 3 hits.
    • Koshka’s Grenade Pistol rolls 1 hit. Damage Resilience provides no effect.
    • Lara suffers 1 hit, and the Heavy Flak Grenadiers are eliminated.
    • Close Combat:
      • Six Knife and Grenade manage 3 hits. Damage Resilience saves against 1 hit and Lara suffers an additional 2 damage.
      • Lara’s Combat Knife deals no damage to Koshka and her Fakyeli.
  • Ludwig targets the SSU Airborne Transport for a Sustained Attack.
    • MG 44 misses the SSU Helicopter!
  • Heinrich targets the Chinese Volunteers for a Sustained Attack.
    • 2 cm FlakVierling rolls 3 hits on the SSU Auxiliary Unit.
  • Grand’ma Moves and Attacks the Luther.
    • “VK-916” Howitzer rolls 1 hit on the Axis Walker.
  • Airborne Transport Attacks Lara.
    • Quad DahK 12.7 mm rolls 1 hit on Lara. Damage Resilience provides no effect and the Axis Hero is eliminated.
    • SSU Airborne Transport Moves for its second action.
  • The Medvedi successfully reactivates Ohotniki with the Get Moving You Bunch of Monkeys! Skill.
    • Ohotniki Moves and Attacks Markus and his Axis Gorillas.
      • Both Widowmaker Rifles miss their targets!
      • Three PPSh-48’s roll 2 hits. Corner Cover gives the Gorillas Soft Cover and saves against 1 hit. Markus suffers the other hit.


Turn 3:
Initiative: SSU
  • Ohotniki targets Markus and his Axis Gorillas for a Sustained Attack
    • Both Widowmaker Rifles roll 2 hits!
    • Three PPSh-48’s roll 2 hits.
    • Corner Cover gives the Gorillas Soft Cover and saves against 1 hit. Markus suffers 3 additional hits.
    • Close Combat:
      • Five Knife and Grenade manage 4 hits. Markus takes an additional wound and the other 3 hits eliminate the Axis Gorillas.
      • The Combination of Markus’ Schwer Panzer Gloves and the Axis Gorillas standard Panzer Gloves roll 9 hits to eliminate the Ohotniki!
  • Markus Charges the Chinese Volunteers!
    • Both Schwer Panzer Gloves manage 4 hits to eliminate the SSU Auxiliary Unit.
    • Two Knife and Grenade miss the Charging Gorilla Hero!
  • Frontoviki Move and Attack Markus.
    • Both DPM MG’s roll 2 hits to eliminate the Blutkreuz Ape Hero.
  • Heinrich Moves and Attacks SSU Airborne Transport.
    • 2 cm FlakVierling rolls 2 hits to eliminate the SSU Airborne Transport.
  • Natasha Moves and Attacks a Heinrich.
    • The dual 45 mm Howitzer roll 1 hit on the Light Panzer Walker.
  • A Heinrich targets Koshka and her Fakyeli in a Tank Trap for a Sustained Attack.
    • 2 cm FlakVierling rolls 2 hits, but the SSU unit is saved by the Hard Cover.
  • Luther targets Grand’ma for a Sustained Attack.
    • 5 cm FlaK 43 misses!!
  • Ludwig targets Koshka and her Fakyeli in a Tank Trap for a Sustained Attack.
    • 8.8 cm FpK zwei rolls 4 hits!! However, the Hard Cover prevents any damage to the unit!!
  • Grand’ma targets the Luther for a Sustained Attack.
    • “VK-916” Howitzer rolls 2 hits on the Medium Panzer Walker.
  • Recon Grenadiers target the Jnetzi in a Tank Trap for a Sustained Attack.
    • MG 48 rolls 3 hits
    • 4 StG 47’s roll 2 hits.
    • Hard Cover saves against 3 of the hits, but the remaining hits are enough to eliminate the SSU Sniper Team.
  • The Medvedi successfully reactivate Grand’ma with the Get Moving You Bunch of Monkeys! Skill.
    • Grand’ma Assault Moves to close the distance the Luther and Heinrich’s.


Turn 4:
Initiative: SSU
  • Grand’ma targets the Luther and a Heinrich for a Sustained Attack.
    • “VK-916” Howitzer rolls 2 hits to eliminate the Luther.
    • Sulfur Thrower misses the Heinrich!
  • A Heinrich targets Koshka and her Fakyeli in a Tank Trap for a Sustained Attack.
    • 2 cm FlakVierling rolls 5 hits. The Tank Trap saves 4 of the hits, and Koshka absorbs the remaining hit to protect the unit.
  • The other Heinrich targets Koshka and her Fakyeli in a Tank Trap for a Sustained Attack.
    • 2 cm FlakVierling rolls 3 hits, but the Hard Cover proves to be ineffective this time and the unit suffers all hits.
  • Ludwig targets Koshka and her Fakyeli in a Tank Trap for a Sustained Attack.
    • 8.8 cm FpK zwei rolls 2 hits. The Hard Cover saves against both hits.
  • Recon Grenadiers Move and Attack Grand’ma.
    • All three Panzerfausts miss their target!
  • Koshka and her Fakyeli Move and Attack the Heinrich and Recon Grenadiers
    • Four Molotov Cocktails roll 2 hits to cause 4 wounds and eliminate the Light Panzer Walker.
    • Sulfur Thrower rolls 1 hit on the Recon Grenadiers
    • Three PPSh-48s roll 2 hits, but the Soft Cover provided by the Corner of the Heinrich prevents 1 hit from reaching the Recon Grenadiers.
  • The Medvedi fail to reactivate Natasha with the Get Moving You Bunch of Monkeys! Skill.


Turn 5:
Initiative: Axis
  • The remaining Heinrich target Koshka and her Fakyeli for a Sustained Attack.
    • 2 cm FlakVierling rolls 4 hits. Koshka falls in battle and only a single Fakyeli remains after the devastation.
  • The remaining Fakyeli targets the Recon Grenadiers for a Sustained Attack.
    • Sulfur Thrower rolls 3 hits to eliminate the Axis Recon Squad.
  • Ludwig Moves and Attacks the remaining Fakyeli benefiting from Corner Cover.
    • 8.8 cm FpK zwei rolls 2 hits, which penetrate the Soft Cover to eliminate the SSU Close Combat Squad.
  • Grand’ma Attacks the Heinrich.
    • Sulfur Thrower rolls a hit, which inflicts a damage of 4 and eliminates the remaining Light Panzer Walker.
    • Grand’ma Moves for her second Action.
  • Natasha Moves and Attacks the Ludwig.
    • The dual 45 mm Howitzers utilize their All In One Skill and roll 1 hit on the Ludwig!


Turn 6:
Initiative: SSU
  • Natasha targets the Ludwig for a Sustained Attack.
    • The Dual 45 mm Howitzers roll a single hit on the Medium Panzer Walker.
  • Ludwig targets the Natasha for a Sustained Attack.
    • 8.8 cm FpK zwei rolls 5 hits to eliminate the SSU KV47.
  • Grand’ma is blocked by Tank Traps from reaching the Ludwig, so targets one of the Tank Traps for a Sustained Attack. Only the Howitzer has any effect, since Flame Weapons cannot damage the concrete of the Tank Trap.
    • “VK-916” Howitzer rolls 1 hit on the Cover Element.
  • The Medvedi fails to reactivate Grand’ma with the Get Moving You Bunch of Monkeys! Skill.


Turn 7:
Initiative: Axis
  • Ludwig targets Grand’ma for a Sustained Attack.
    • 8.8 cm FpK zwei rolls 2 hits on the Rare SSU Walker.
  • Grand’ma targets the same Tank Trap for a Sustained Attack.
    • “VK-916” Howitzer misses the Cover Element.
  • The Medvedi successfully reactivate Grand’ma with the Get Moving You Bunch of Monkeys! Skill.
    • Grand’ma targets the same Tank Trap for a Sustained Attack.
      • “VK-916” Howitzer misses the Cover Element.
Turn 8:
Initiative: SSU
  • Grand’ma targets the same Tank Trap for a Sustained Attack.
    • “VK-916” Howitzer rolls 1 hit on the Cover Element.
  • Ludwig targets Grand’ma for a Sustained Attack.
    • 8.8 cm FpK zwei rolls 4 damage to eliminate the modified KV47-B.
Turn 9:
Initiative: SSU
  • Ludwig targets the advancing Medvedi with a Sustained Attack. 
    •  The 8.8 cm FpK zwei and MG 44 roll a total of 5 hits to eliminate the SSU Command Squad.
At this point in the game the SSU had no units remaining that could damage the Ludwig Panzer Walker. The game was called as an Axis Victory!

Victory Points:
  • Christian - Axis: 244 Points 
  • Justin - SSU: 230 Points

The only limitations the Axis player was faced with were the available miniatures on hand (No Zombie Heroes, or Heavy Recon Grenadiers, etc…). The SSU player only had Grand’ma and one KV chassis utilize for walker support. The Natasha was chosen over the Natalya and Nadya due to the range of 6, The All In One Skill, and the ability for the 44 mm Howitzers to ignore cover. The Cover Elements were also placed so that range between infantry units was cut drastically short, and created a “wall” that Vehicles would have to blow their way through to reach another portion of the map. The infantry units had to try and take the Crossroads section of the map in order to maximize their effectiveness and gain range on their enemy.

The SSU Airborne Transport proved its usefulness again. Not only did the Carry Capacity allow Koshka and her Fakyeli to get a great starting position on the map, but the reactivation provided by The Medvedi opened the window for the SSU to eliminate a very deadly unit very early in the game. The Helicopter was eliminated in turn 3 since the Axis brought many anti-aircraft options, so I am starting to question the survivability of such a unit in a large engagement. It is a bit early to come to a conclusion since the Attack Helicopters are not yet released. Hopefully they will provide more of a distraction to the enemy, thereby increasing the SSU Airborne Transports effectiveness in combat.

The Chinese Volunteers weren’t too effective this time around. They did a good job of utilizing their Agility Skill to move around the map and get a good defensive position, but the Heinrich is very good at chewing up infantry units, and the follow up with Markus was just too much for the Auxiliary Unit to handle.

The Frontoviki (SSU Battle Squad) wasn’t a large part of the combat. Their inability to damage Vehicles were part of the reason the SSU player kept them tucked back and away from the Heinrich’s. A majority of the Axis infantry units were eliminated by the end of Turn 3 so the Frontoviki weren’t able to accomplish much else, other than finishing off the Blutkreuz Ape Hero. I have to stand by my original statement; 19 points is too expensive for this unit with no usable vehicle killing power and minimal firepower against Aircraft. I feel that the cost of this unit should be 16 points, maybe 17 points at the most.

The Ohotniki (SSU Rifle Squad) are a very expensive unit for what the player gets in return. There are two Widowmaker Rifles with a range of 6 in the squad, and 3 PPSh-48 SMG’s. The Widowmaker Rifles can do 1/1 against vehicles up to armor 4, and 1/1 for all Infantry Armor classes, but the soldiers using the weapons are not trained well enough to be given the Sniper Skill. The unit can start taking shots at a range of 6 with its two special weapons. 2 dice have a 55.56% of obtaining at least 1 hit, and an 11.11% chance of obtaining 2 hits. So you’ll probably hit once for each time you fire both Widowmaker Rifles, which is okay against Infantry but not very good odds when faced with unlimited range Heinrich’s, Luther’s, Ludwig’s, Lothar’s, Sturmkonig’s, Konigsluther’s, Pounder’s, Rattler’s, Punishers, and pretty much any other vehicle that can start shooting at a range comparable to 6. The Sniper ability would definitely make this unit more worthwhile to the SSU since it would force the Allied and Axis commanders to think twice before advancing on this unit. Also I feel the Widowmaker Rifle should be able to damage all vehicles with 1/1. The cost is the same of Both Hunters or Tank Killers, but the vehicle killing power is laughable when compared to the Allied and Axis equivalent. The Ohotniki seem to hold their value in very specific situations as opposed to a well-rounded unit able to handle most circumstances, such as finishing off lighter enemy vehicles that have been damaged, or harassing (not eliminating) infantry at a distance. The SSU Rifle Squad will have some power if they are within a range of 2 on armor 1 or 2 infantry, but again, that is a rather specific situation.

The Medvedi (SSU Command Squad) performed very well in this mission. The reactivations were a huge help to the SSU forces, but the SSU Player did under use the unit’s potential. Both the Natasha and Fakyeli could have been brought back to help deal with the Ludwig. At no point did the SSU Player attempt to bring any units back with the Command Squad Skills. Granted there is no guarantee that it will be successful, but a successful Field Repair or Come On Guys; We’re Going Back Out There skill roll would have changed the course of the game drastically. Instead the SSU Player charged The Medvedi in to battle with the hopes that the Mechanic would have a chance to engage and potentially eliminate the Ludwig with is Power Tool Weapon (4.53% chance of gaining 4 or more hits on an armor 4 vehicle). Also, the SSU player should have insisted on a turn limit of 8, since that would have clinched an SSU victory (The Ludwig would not have destroyed The Medvedi in round 9, and the points would have been SSU: 230 and Axis: 200).

The Nabludatyel (SSU Observer Team) were pretty much just filler to max out the number of points in the SSU army and provide a “free” activation. This unit will prove its worth once the SSU Walker Transport is released with the Airlift KV’s, since that is where the Nikita (KV47-E Aero), the SSU Artillery unit, will be made available.

The Jnetzi (SSU Sniper Team) were limited since the Tank Traps blocked much of the Line Of Sight that Sniper Teams love to use to their advantage. The smart thing may have been to focus their attacks on the Ludwig to try and wear the walker down and give the other SSU units a better chance at taking down the Axis beast of a Medium Walker.

Kohska and the Fakyeli (SSU Close Combat Squad) were definitely the MVP’s of the SSU forces. Even though the unit was eliminated in Turn 5, the combination was able to eliminate the Heavy Flak Grenadiers, a Heinrich Light Panzer Walker, a squad of Recon Grenadiers, while heavily damaging Lara before meeting their end. Plus the Cover saves really did their part in keeping this unit alive as long as possible. The Molotov Cocktails still proved very useful against the walkers, and the Sulfur Thrower was able to hit the last 3 Recon Grenadiers in a Sustained Attack. The only drawback was that Koshka was eliminated before she had a chance to take advantage of her Fighting Spirit Skill. She could have piloted Grand’ma and used her Skill to bust through those Tank Traps and give the Ludwig a run for its money.

Grand’ma (Koshka’s personal modified KV47-B) performed well against the Axis Walkers. Granted it took a little while to wear down the Luther and the Sulfur Thrower was not all that dependable, but she was able to eliminate a Luther and Heinrich Panzer Walker. Grand’ma would have been able to give the Ludwig a run for its money had the Tank Traps not been an issue with closing distance and range. This was a good performance for a Rare Unit.

Natasha (KV47-B) tried her best to help the SSU forces out in this battle. The range of 6 isn’t all that terrible, but it’s not all that great either. Plus the 45 mm Howitzer is pretty weak against armor 4 vehicles and useless against anything with a higher armor rating. This is the only KV, for the moment, with any range. But there is a complete lack of vehicle killing power. It can be a threat against armor 3 otherwise it’s better used to mop up damaged armor 4 walkers. The All In One Skill is nice and can come in handy, but that will be short lived if the dice don’t perform well (much like what happened in this game). I look forward to the Airlift KV’s. The Nikita will bring the unlimited range that the SSU sorely needs to combat infantry and vehicles with its Artillery Weapon. Plus the Nikita doesn’t need to reload the Artillery piece and it’s the only Artillery Weapon that will ignore cover provided by a structure. The Nastasia will provide excellent anti-infantry and anti-aircraft support, at a range of 6, and its damage to vehicles is comparable to the Natasha. The Nina is where the vehicle killing power lies for the SSU. Two separate RPG-47’s that can kill up to armor 5 vehicles in one shot with a range of 3. Airlifting this unit around the board will be a nightmare for the enemy and force their army to concentrate fire on the Helicopters, which exposes a weakness that the SSU will soon have the power to exploit!

This was a great battle between SSU and Axis forces. The Armor 3 Axis units proved to be tough to overcome, but the SSU was able to pull through. However this would have been a very different game had Angela and her Sniper Grenadiers survived a bit longer and took a few shots at the SSU. The Axis was able to pull through and gain the victory, but the SSU was very close to keeping the victory in their corner as well. I do have a small issue with the complete lack of well-rounded units in the SSU army. I’m sure the Drakoni will fill that role well, but at 28 points there should be more than 1 infantry unit that has a well-balanced feel. I hope we see more units announced for the SSU soon and I am curious if/when Armor 3 SSU units will become available. I do look forward to the Drakoni, but also suspect that only a few of the Commissars will really be worth their value when adding them individually to Infantry units.

We will be doing more battle reports soon and keep your eye on the upcoming Dust Fanzine for original content that you won’t find anywhere else! Future Battle Reports will contain the First Wave SSU versus the Allies, expanded SSU units versus Allies (much like this Battle Report), and much more! We just finished our Operation Blue Thunder v2.0 Campaign League Play and the final battles and league winners will be named tomorrow. Stay tuned and Good Gaming!!