
Destruction
Play-test 1
Date Played: 07-15-2012
The Allies have located a hidden Axis outpost near the town of Wick in the Highlands of Scotland, near the raging battlefield of Scapa Flow. The Axis platoon is hiding out in an abandoned structure near the River Wick and is thought to be awaiting further reinforcements. ASOCOM has determined that the Axis units and the structure must be eliminated and has dispatched a force to set demolitions in the building and destroy it at all costs. The Axis troops are suspected to have units hidden in the surrounding forest to protect the outpost from any approaching force, and their reinforcements should be arriving at any time.
What is the point of this scenario? The point is for the Attacking player to enter and destroy the structure. The details will be found in the scenario guidelines below. The idea behind this scenario was to create a possible "suicide mission" since it will be possible to sacrifice the unit and detonate the explosives immediately, at the cost of an additional action and a penalty to victory points.
We played 2 games during this Play-test since the first game was over in less than 45 minutes. These were very challenging games for the Attacker, but provided great insight to how the scenario can be improved during future Play-tests. Delayed deployment and changing deployment zones for the Defender are a few of the adjustments that will be made the next time around.
Special Terrain:
- Forest Tiles:
Refer to OperationGhostlight for rules on Forest Tiles, but here are the basics: - Blocks Line Of Sight, except for a unit occupying the space.
- Blocks Vehicle Movement
- No Cover Elements may be placed on this square
- Provides Soft Cover for Infantry Units.
- No Cover upgrade to Corner Cover from Forest Tiles for units already occupying a forest tile.
- Can be set on fire to become a Forest Fire Tile by Heavy Laser Weapons, Phaser Weapons, and Flame Weapons. See Operation Ghostlight for more details.
- Forest Fire Tiles block all movement (including jump), block all line of sight, and cannot be occupied by any unit.
- No turn limit, unless desired by the players. Good rule of thumb is 10 turns.
- Army Points:
- Infantry and Heroes Only!
- 200 to 250 points for both the Attacker and Defender
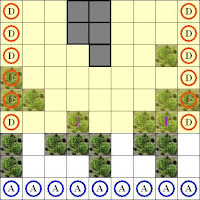
- Cover Elements
- Defender places on any valid space within the highlighted section of the map.
- 2 Tank Trap
- 2 Ammo Crates
- No initiative roll on the first turn only. See Attacker section for more details.
- The objective is to destroy the Structure that the Axis are using as a foothold in the Highlands of Scotland. The Structure is 3 stories tall and should resemble something close to the "standard" look of the Cerberus and Zverorgrad buildings.
- The Defender will have a force deployed in secret. Refer to the Defender section for rules regarding those units. All other units will enter the board normally during the first turn.
- Each Attacking Infantry and Hero unit is considered to have all the necessary resources to complete the mission. These resources are limited however, and once a unit no longer has these resources once the explosives are placed. These resources may be "reloaded" using the Ammo Dump Skill provided by the NCO Command Units following their normal rules.
- To place a charge the Attacking player must spend one action. Roll a single combat die and on the result of a "miss" the charges are successfully placed. This charge is considered to be "time-delayed" and will detonate at the end of the next round.
- If placed in round 5, they will detonate at the end of round 6.
- An Attacker may spend 2 Actions to place the charges and have them detonate immediately. Roll 2 combat dice, and if there is at least 1 "hit" result the charges are successfully placed and detonation occurs immediately. A unit lost in this manner will provide the enemy double their amount in victory points.
- A Defending Infantry or Hero unit may attempt to disarm a time delayed charge. To do this the defending unit must move into the square containing the explosives and spend an action to attempt to the disarm. Roll a single combat die and on the result of a "hit" the explosives are successfully disarmed. A unit that spends more than one action to attempt a disarming of the explosives will roll a combat die for each action spent this way and will succeed if at least 1 of the die produces a "hit" result.
- If the explosives detonate the structure is destroyed and the game is almost finished.
- No other actions are taken by any other unit on the board.
- Any unit occupying the square where the explosives were placed is automatically eliminated.
- Other units in the structure most resolve a combat die roll against each individual miniature. On the result of a "hit" that miniature will suffer 1 damage. Any units that survive are then placed on any unoccupied valid square adjacent to the structure. If no unoccupied valid adjacent squares are available then the unit is eliminated.
- Attacker Rules and Objectives:
- Destroy the Structure at all costs! The Axis cannot be allowed to gain another foothold in Great Britain.
- Always takes the first activation of the first turn.
- Defender Rules and Objectives:
- Protect the Structure and eliminate the enemy! Reinforcements are due to arrive at any moment.
- Secretly deploy no more than half your forces in the forests and cover elements. Only the Forest Tiles and Cover Elements within the highlighted cover area may be used to hide units.
- Units deployed in Forests Tiles and Tank Traps are not revealed until:
- They are activated and perform a Move, Attack, or Skill action
- Attempt Reactive Fire (regardless of success)
- The enemy moves into an adjacent square
- If an Attacking unit is moving and enters the same square as a hidden unit during their turn the 2 units immediately engage in close combat and resolve a single attack action using only close combat weapons. If both units survive the Defending unit stays in the square and the Attacking unit moves into it's previously occupied square. If the Defending unit is eliminated the Attacking unit's activation ends and occupy that square.
- The rest of your units are the "Reinforcements" that you have been waiting for.
- A limit of 1 unit may be deployed anywhere inside of the structure during deployment.
- Points and Victory:
- The Defender wins if they are able to prevent the destruction of the Structure. This can happen in many ways:
- The Structure is still standing at the end of the turn limit
- The Attacker exhausts all his available explosives
- The Attacker is eliminated
- The Attacker wins if they are able to destroy the Structure.
- Victory points from full unit kills may be tallied for other purposes, but are not used for any purposes for this scenario at this time.

GAME 1
Justin v. Christian
- Attacker:
Justin - Allies: 200 points
Bazooka Joe - Johnny One-Eye - OZZ-177 - The Chef - BBQ Squad - Crack Shots - Grim Reapers - Hell Boys - The Gunners - Defender:
Christian - Axis: 201 points
Grenadier X - Lara - Markus - Axis Gorillas - Axis Zombies - Heavy Flak Grenadiers - Kommandotrupp - Recon Grenadiers
- Pregame:
Cover was placed by the Defender. The Tank Traps were side by side, and positioned between the Structure and Forest to the left of the map, effectively cutting off all line of site to that side of the Structure. The Ammo Crates were placed on the other side of the map in a diagonal formation. The combinations of Markus and the Axis Gorillas, and Lara and the Heavy Flak Grenadiers were placed in the forest for the hidden deployment. 1 - MARKUS AND AXIS GORILLAS2- LARA AND HEAVY FLAK GRENADIERS
 - Turn 1:
The Allies charged ahead and moved OZZ and his Grim Reapers 4 spaces... Right into Markus and his Axis Gorillas! They 2 units were occupying the same space, which reveals the Blutkreuz Apes and immediately engages both units in Close Combat. The Allies did a little damage to the Apes, but were severely hurt in return. The Zombies came onto the board to assist Markus and his Gorillas and finished off OZZ and his Grim Reapers while taking little damage in return. A hard loss for the Allies early in the game. Their response was to bring in their Hell Boys and BBQ Rangers to set the forest ablaze to force both Blutkreuz units to retreat.. The Kommandotrupp was the unit the Axis choose to deploy into the building, where it stayed for the remainder of the game issuing their orders from within the objective.
- Turn 2:
The Crack Shots moved up into the forest, while the rest of the Allied units moved away from the slowly burning forest. A double pronged attack from the Axis cost more Allied lives when Lara and her Heavy Flak Grenadiers revealed themselves while Markus and the Axis Gorillas attacked at the edge of the burning forest to eliminate the Crack Shots, nearly every Gunner Ranger and 3 hits on Johnny, and 2 hits on Chef with 2 more on the Hell Boys. The Axis Zombies in excellent position to support both Axis units in the next turn.
- Turn 3:
This round was the bloodiest of them all. The Allies took the initiative and Chef and his Hell Boys did enough damage to eliminate Lara and the Heavy Flak Grenadiers and plenty of hits on Markus and his Axis Gorillas. The Blutkreuz Apes fought back hard against Chef with the Hell Boys and Johnny with the Gunner Rangers. In the end the Blutkreuz Apes fell and were able to finish off Johnny with his Gunners. Grenadier X with the Axis Zombies then moved in for the kill to finish off Chef and the Hell Boys. However, Bazooka Joe was able to get revenge and eliminate the Blutkreuz Zombies with the help of his BBQ Rangers! The ever sneaky Kommandotrupp was successfully able to bring the Axis Zombie back into play with the Come On Guys; We're Going Back Out There skill before the end of the Turn.
- Turn 4:
The Axis Zombies charged into Joe with the BBQ Rangers, but Reactive Fire proved too effective and the Axis Zombies were once again eliminated before they had a chance to do further damage to the only remaining Allied unit.
- Turn 5:
The Axis Recon Grenadiers moved into a Tank Trap with line of sight on Joe and the BBQ Rangers in the forest and opened fire and severely hurt the unit leaving only Joe and the Flamethrower remaining. The Allied unit moved ahead and returned fire, but were only able to eliminate 4 of the 5 miniatures leaving the MG 48 to oppose the Allied unit.
- Turn 6:
The Axis won the initiative and opened fire on the Allied unit to eliminate Joe and the BBQ Rangers to win the scenario!


GAME 2
Justin v. Christian
- Attacker:
Justin - Allies: 250 points
Action Jackson - Bazooka Joe - Johnny One-Eye - OZZ-177 - Crack Shots - Grim Reapers - Hell Boys - Recon Boys - Recon Boys - Red Devils - The Gunners - The Gunners - Defender:
Christian - Axis: 250 points
Angela - Grenadier X - Markus - Axis Gorillas - Axis Zombies - Beobacther - Kommandotrupp - Laser Grenadiers - Recon Grenadiers - Recon Grenadiers - Sniper Grenadiers - Sniper Grenadiers - Pregame:
A Tank Trap and Ammo Crate were placed adjacent to each other and the solo Forest Tile on the right side of the map. The other Ammo Crate was placed next to the longest part of the structure. The other Tank Trap remained in it's previous position next to the forest on the left hand side of the table. The Axis chose to hide Angela with a unit of Sniper Grenadiers in the solo Forest Tile next to the Tank Trap and Ammo Crate, Recon Grenadiers on the right hand side in the top most Forest Tile of the group, another unit of Recon Grenadiers in the top most Forest Tile oft he middle group, and Markus with the Axis Gorillas on the left hand side of the map in the Forest Tile next to the Tank Trap that remained in it's location. 1 - ANGELA AND SNIPER GRENADIERS
2 - RECON GRENADIERS
3 - RECON GRENADIERS
4 - MARKUS AND AXIS GORILLAS - Turn 1:
The Crack Shots were taken out early in the deployment phase by Grenadier X with his Axis Zombies who deployed from the side of the table and engaged them in Close Combat. Joe and his BBQ Rangers were quick to retaliate, but that left them open to fire from the Laser Grenadiers when they deployed onto the board from the same side of the map. OZZ was attempting to set the forests on fire, as was Action Jackson with his Red Devils. The Recon Grenadier in the middle decided to engage OZZ with his Grim Reapers inflicting damage on OZZ in the process.
- Turn 2:
The Axis won the initiative and eliminated OZZ and his Grim Reapers with the Recon Grenadiers. Johnny was able to exact swift revenge with the help of his Gunner Rangers. Joe and his Rangers retreated, which allowed the Recon Boys and the Gunner Rangers a chance to finish off the Blutkreuz Zombies and inflict 3 hits on the Laser Grenadiers. Action Jackson utilized his Assault ability to close distance to the objective and charged up the battle field with this Red Devils, only to take fire from the other hidden unit of Recon Grenadiers, and then had Markus and his Axis Zombies move in to finish them off.
- Turn 3:
The Allies lost their solo unit of Gunner Rangers to the unit of Axis Zombies that the Kommandotrupp, still hiding in the building, were able to bring back with the Come On Guys; We're Going Back Out There skil. The unit of Recon Boys that was backing up Action Jackson fell to the combined firepower of Beobachters, Recon Grenadiers, and Markus with this Axis Gorillas. The remaining Recon Boys moved into position to fire on and eliminate the Sniper Grenadiers, who were hiding in the tank trap on the left of the board, as well as eliminate another Laser Grenadier hiding in the forest. Johnny and Joe, both with the Gunner Rangers and BBQ Rangers respectively, were only able to cause 2 wounds on the revived Axis Zombies.
- Turn 4:
The Recon Boys fell at the start of the turn after the forest they were using for cover caught fire from the raging inferno and were forced to retreat near the Axis Zombies, who had very little trouble finishing off the defenseless unit. Johnny and Joe, with their respective units, were able to finish off the Axis Zombies and eliminate the remaining Laser Grenadier. The Recon Grenadiers and Beobacthers made their way toward the remaining Allied units. Angela has not been revealed yet.
- Turn 5:
Markus Charged into Johnny and his Gunner Rangers, who were able to wear the unit down with successful Reactive Fire, and resulted in the units eliminating each other when the Blutkreuz Apes finished their charge on the Allied unit. Once again it was down to Bazooka Joe and a lone Flamethrower to win the scenario!
- Turn 6:
The Recon Grenadiers made an unsuccessful attempt to move in and attack the remaining Allied unit, only to have a sustained Attack from Joe and the Flamethrower eliminate the Axis recon unit. The Beobacthers were still making their may towards the Allied unit, though much more cautiously than the Recon Grenadiers.
- Turn 7:
The Beobacthers decided that it was time to take a chance and charged in and attacked the Allied unit! Both Beobacthers hit with their weapons and the Allied unit failed both cover rolls. Once again the Axis win through elimination!!


What are some things we can try in the next play-test?
- Point will be either 250 or 300 for each side.
- Defender's deployment zones are changed to the map edge opposite the Attacking player's deployment zone. This will not include the building, only map edge spaces outside the structure.
- The Defending player will not deploy the rest of his army in Turn 1. Instead the units will arrive either in Turn 2 or Turn 3. The Attacker will always be the initiating player in Turn 1, but if the Axis player wins the initiative for Turn 2, then they can deploy their remaining forces in that turn. Otherwise the Axis player must wait until Turn 3 to deploy their remaining units.
- The Attacker can deploy up to 150 points of units in Turn 1. An additional 50 points are added each following turn to deploy the remaining Attacking forces until all units are deployed.
- Victory Conditions:
- Defender wins if they successfully protect the Structure.
- Attacker wins if they destroy the Structure AND obtain more victory points.
- Draw/Tie in the event the Attacker destroys the Structure and the Defender scores a higher VP total than the Attacker.
A full on Warfare Battle Report is in the works and should be completed within a week. More games coming this weekend and a new League is underway! Stay tuned for further updates and Good Gaming!!
No comments:
Post a Comment